
Coconut Love Sequence – 2. Make coconut milk
I was extremely happy when I finally found the perfect canned coconut milk on the shelf of my grocery store. It was organic, contained nothing else but coconut and water, had great texture and tasted great.
Soon after, I started to become very conscious of all the cans I was using, especially due to the fact that separating and recycling trash is not a common practice where I live. I was generating a lot of waste and (because I was determined to recycle all the used cans somehow) I was also accumulating it. In order to stop this, I decided to start making my own coconut milk.
What encourages me to be an advocate for homemade vegetable drink ( ”milk” ) other than my belief that it is more beneficial it is compared to conventional shelf milk, is the facts that making it at home prevents a lot of waste and contamination. But most of all the fact that it tastes amazing. The ones who can bear testimony to this are good friends who had once told me that they didn’t like coconut milk until I convinced them to try the homemade one. In more than one case, they shifted from “I don’t like it” to “I love it” and I even got comments like “This is so good and it tastes so different.”
If, like many others, you think that making your own coconut milk is too complicated and time consuming, I’d prefer you tried it first so that you can judge for yourself. Originally, I was planning to record myself showing in a short real-time video how I do it. Then I realized that there are some really good videos already out there so there was no need for another one. If you’d like to see a video, in the ”HOW TO” section below there’s a link to the one I’ve found to be the best so far. Instead of making a video, I decided to note down a few tips I’ve gathered around that will help you get the best result. Check them out and make your own coconut milk.
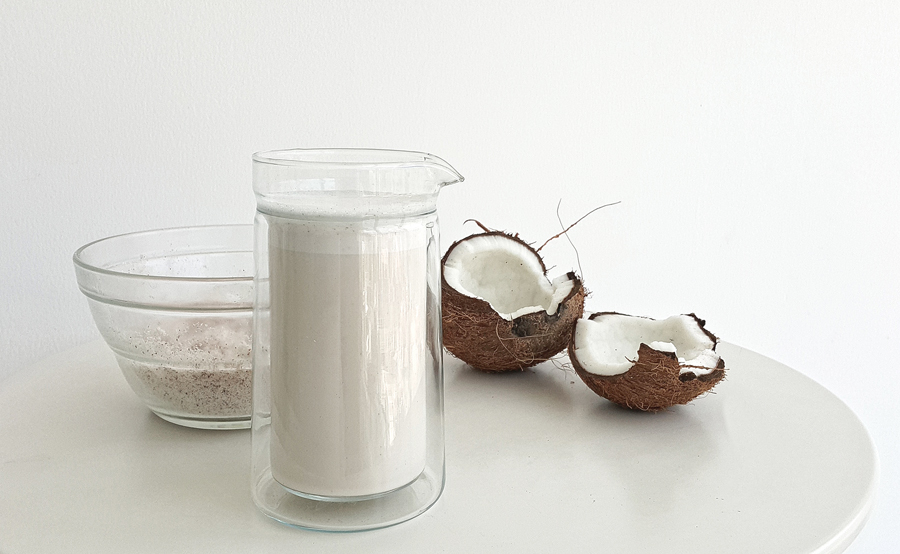
1. Coconut
Of course, the taste of your milk will depend greatly on the quality and taste of the coconut you use. I always try to prepare my milk from fresh ones, though I’ve also tried some of the alternatives mentioned in the video I’ve linked. You won’t waste time and energy separating the brown part from the coconut flesh and the only difference is that the milk will not be completely white but ivory. This way, in addition, whatever solids are left will add an extra insoluble fiber content to your baked goods. In absence of fresh coconut, making the milk out of desiccated coconut is quite a quick and decent alternative. This is a great option especially when you plan to use the milk for cooking or smoothies. In this case, I soak the coconut in warm water (or hot water if I don’t have a lot of time) blend it well and, because it doesn’t need to be as smooth as for drinking, most of the times I don’t even strain it.
2. Water
It makes a huge difference if the water is filtered. Avoid bottled mineral water as some of their mineral content can alter the taste. An alternative to filtered water can be boiled potable tap water. If you’re using this water, you should boil it and let it cool down unless you’re making a latte or maybe a hot chocolate in which case leaving it warm will be better. Most of the times, I use whatever coconut water I obtained from the coconut itself and top it up with ‘normal’ water to get the needed amount of liquid for blending. This gives an additional flavor and sweetness to the milk.
3. Additives
If your main ingredient is of good quality you don’t really need anything else as far as taste is concerned. I’ve seen people recommending lecithin as an additive to preserve the smooth, homogeneous consistency. Personally, I’m wary of any processed products (especially the ones proceeding from soybeans and sunflower seeds). I do not add any of these. In any case, if you want your milk to be smooth just shake it and the smoothness is back. If the fat has separated and it’s hardened after being in the fridge, just warm it up and blend it again and it will soften down and unify. Then you will have the perfect consistency.
Optional things that I often use:
Coconut oil – I always add it to my milk as I want it to be creamier. It will make more foam if I use it for a latte or a coffee. Also, I believe more fat is better for me to balance the natural sugars occurring in this drink and I just prefer it that way.
Salt – I use just a tiny bit of finely ground Himalayan salt or sea salt to balance the taste.
Flavoring: stevia, vanilla, cinnamon, cacao, etc. – When making lattes, smoothies or chocolate milk I usually add a few drops of stevia to make the milk slightly sweeter but sometimes I also blend in some ground vanilla beans and even cinnamon. Because coconut already has a characteristic natural sweetness, most of the times you won’t even need any additional sweetener. If anything, stevia or a bit of natural honey will do the trick. Plus, a bit of raw cacao powder mixed with coconut milk makes great chocolate milk and if you want the perfect hot chocolate just add a bit of cacao butter. With its distinctive aroma, it will give the milk additional thickness and creaminess.
4. Blending
You really need a strong blender to make coconut milk tasty. The stronger the blender you use and the longer you blend it for, the smaller the particles will be. This will allow for a fuller taste and added creaminess.
5. Straining
The easiest and fastest way to strain your milk is to get a nut-milk bag. If you’re travelling or you don’t have one, the alternatives I’ve found that work best are teabags or even gauze from a pharmacy. You will need a few large teabags to strain the milk made out of one coconut and for the gauze you will need to fold it a couple of times to adjust the cloth’s thickness and density.
6. Using the remainders (leftovers from the blended coconut flesh)
Do not dispose of whatever’s left. The best way to use it is to dry it and keep it for use in your baking goods as an alternative to a commercial nut or coconut flour. My personal favorite is using it to make coconut bread. Dehydrating it will enable you to store it for a longer period of time. If you don’t have a dehydrator, you can spread it on the surface of an open dish without anything on top to cover it (maybe just a cloth) and place it in the fridge. This will prevent it from moulding and spoiling and it will also dry out due to the fridge’s dry air. I always use this technique and I’ve sometimes kept dehydrated coconut flour for weeks without it going bad.
Step 1 Cut the coconut flesh in pieces. Place the pieces in a blender.
Step 2 Add water and/or coconut water and blend it all together until you get a thick rather homogeneous mix.
Step 3 Strain the milk and squeeze all the liquid out of the flesh.
Step 4 Add any optional ingredients and blend it again.
Step 5 Keep it refrigerated for a few days.
I’ve linked a YouTube video by Petra, Holistic Nutritionist and Chef (Nutrition Refined) that I found explains it all really well.
Coconut Milk – 3 Ways to Make It at Home by Nutrition Refined
Megan May’s books of recipes and whole food vegan basics:
https://littlebirdorganics.co.nz/products/little-bird-goodness-book
https://littlebirdorganics.co.nz/products/the-unbakery-book
I did not make the perfect milk until I went to Auckland, tried the milk made in her cafe and then followed her tips and quantities for making vegetable milks.
Nutrition Refined website:
https://nutritionrefined.com/
A website with nutritional advice and healthy recipes by Holistic Nutritionist and Raw Food Chef Petra.
photos by Mili